Introduction
Cutting a tri tip roast may seem like a daunting task, but with the right tools and technique, it can be a simple process. How to cut tri tip? In this guide, we will walk you through the step-by-step process of cutting tri tip like a pro.
Understanding The Tri Tip Cut And Its Popularity
Tri-tip is a triangular-shaped cut of beef that comes from the bottom sirloin. It is a popular cut in the United States, particularly in California, where it originated. It has gained popularity due to its affordability, tenderness, and flavor. Tri tip can be cooked in various ways, such as grilling, roasting, or smoking, making it a versatile cut of meat.
Why It’s Important To Learn The Correct Way To Cut Tri Tip
Cutting tri tip the right way is crucial for achieving the most tender and flavorful meat. Slicing against the grain is essential in ensuring the meat is not tough and chewy. Using a sharp chef’s knife and maintaining a steady hand will make the cutting process more manageable and yield even slices.
Learning to cut tri tip correctly will not only enhance the flavor and texture of the meat but also impress your guests with your culinary skills. Mastering this skill is essential for any aspiring home cook or grill master.
Equipment Needed To Cut Tri Tip
Choosing The Right Knife
The right knife is crucial for cutting tri tip effectively. A standard chef’s knife can work for smaller-sized roasts like tri-tip. However, for larger cuts or if you slice a lot of meat, it is recommended to use a long slicing knife. A slicing knife allows for long, clean, and even cuts, which is essential in ensuring the meat’s tenderness and flavor. It is also important to ensure that the knife you use is sharp and comfortable to hold to achieve the best results.
Cutting Board Options
Another essential piece of equipment is the cutting board. It is best to opt for a board made of plastic or wood, which won’t dull the knife’s blade. Additionally, a board with a groove around the edge will prevent the meat’s juices from spilling onto your counter, making clean-up easier afterward.
When preparing to slice the tri-tip, locate the direction of the grain and identify the point where it switches direction. Cutting against the grain is key to achieving the most tender slices of beef. Start with the narrower tail and cut the roast in half at the point where the grain changes direction to make it easier to slice.
In conclusion, knowing the proper equipment to use when cutting tri tip is as important as knowing how to slice the meat correctly. A sharp and comfortable knife, along with a plastic or wooden cutting board, will make your task easier. Cutting against the grain and taking the time to prep your ingredients well will ensure that you have delicious and tender slices of tri tip every time.
Preparing Tri Tip For Cutting
Trimming Excess Fat And Silver Skin
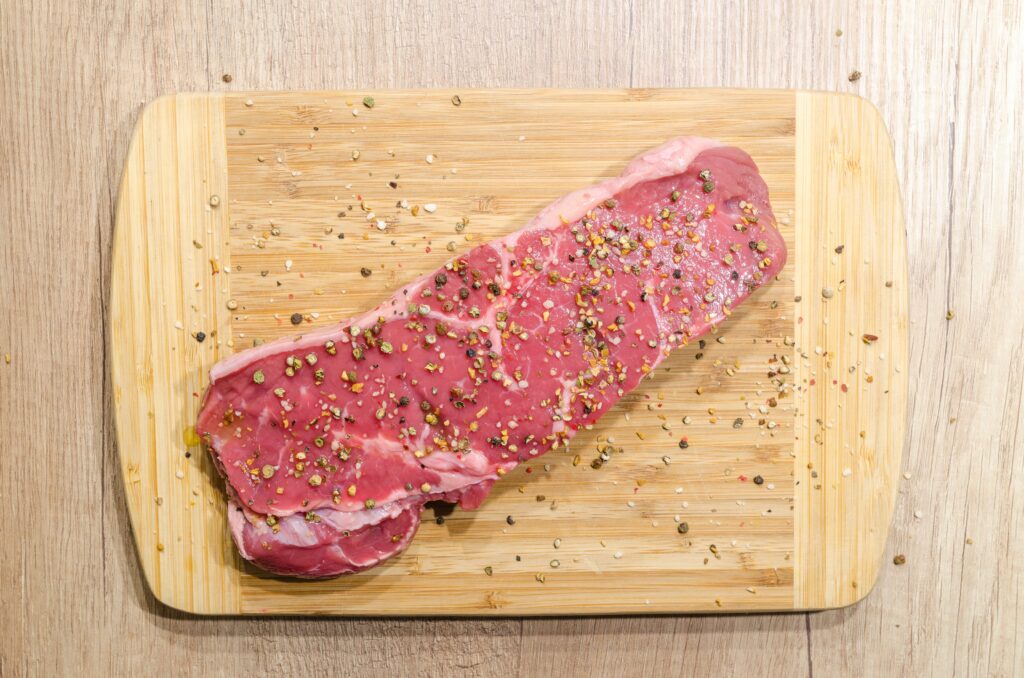
Before cutting a tri-tip, it is important to remove any excess fat or silver skin from the surface. This will not only prevent flare-ups during cooking but also allow the meat to absorb the flavors of any marinade or seasoning you use. While some fat is desirable, overly tapered or uneven cuts should be avoided.
To trim the tri-tip, use a sharp knife to remove any visible fat or silver skin. Hold the knife at an angle and carefully remove the membrane without taking too much meat off with it. A good once-over before seasoning or marinading the meat will ensure a perfect tri-tip when you cook it.
Seasoning And Letting The Meat Rest
Once the tri-tip is trimmed, it is time to season it. A simple yet flavorful rub can bring out the meat’s unique taste, while herbs or spices can add depth to the dish. Season the tri-tip thoroughly on both sides and ensure the rub is evenly distributed before setting it aside to rest for at least an hour before cooking.
Resting allows the juices to redistribute throughout the meat, ensuring a juicy and tender result when you slice into it. When it’s time to serve, locate the grain of the tri-tip. This cut has a unique grain pattern that runs in two different directions. To maximize tenderness, slice against the grain. Aim for thin slices, which will be more tender and flavorful.
In conclusion, properly preparing a tri-tip involves trimming the excess fat and silver skin, seasoning it, and allowing it to rest before cooking. Choosing the right knife and cutting board to slice the meat effectively is also important. With these steps and a little bit of practice, you can achieve delicious and tender slices of tri-tip every time.
Identifying The Grain Of Tri Tip
Understanding The Direction Of The Grain And Why It’s Essential
Before cutting a tri-tip, it is crucial to identify the direction of the grain. The grain in the meat refers to the alignment of muscle fibers, which can be seen as visible lines on the surface of the meat. The grain determines how the meat should be cut, and cutting against or perpendicular to the grain is the best way to achieve tender and juicy slices of meat.
How To Identify The Grain In A Tri Tip
To identify the grain in a tri-tip, first, locate the natural curvature of the meat. The grain will run parallel to this curve. Look for visible lines that resemble patterns in wood; these are the muscle fibers’ alignment and indicate the direction of the grain. Once you have identified the grain, it’s essential to cut against it. Slicing perpendicular to the grain shortens muscle fibers, resulting in tender meat.
It’s important to select a high-quality cut of meat when preparing tri-tip. Carefully observe the surface of the meat to determine the natural alignment of muscle fibers and identify the direction of the grain to ensure the best texture. After trimming any excess fat or silver skin, season the tri-tip and let it rest before cutting to achieve optimal tenderness. Using a sharp knife and a stable cutting board is also essential when slicing the meat effectively. By following these steps, anyone can achieve delicious and perfectly sliced tri-tip every time.
How To Cut Tri Tip Against The Grain
Step-by-step Instructions For Cutting Against The Grain
To achieve tender and juicy slices of tri-tip, it’s essential to cut against the grain. Cutting with the grain can result in tough and chewy bites, similar to biting on a rubber band. Follow these step-by-step instructions for cutting tri-tip against the grain:
- Identify the direction of the grain: Before cutting the tri-tip, it’s crucial to identify the grain’s direction. The grain refers to the alignment of muscle fibers, which can be seen as visible lines on the surface of the meat. Look for visible lines that resemble patterns, indicating the direction of the grain.
- Start at the pointy end: Begin slicing at the pointy end of the tri-tip. Use a sharp knife and cut across the grain in thin slices.
- Slice until you reach the inner corner: Continue slicing until you reach the inner corner of the tri-tip.
- Repeat on the other side: Flip the tri-tip over and repeat steps 2 and 3 on the other side.
Techniques For Getting Even Slices
Getting even slices is crucial to ensure consistent cooking and flavor throughout. Here are some techniques for getting even slices:
- Use a sharp knife: A sharp knife allows for clean cuts, reducing the risk of tearing or shredding the meat.
- Let it rest: Allow the tri-tip to rest for a few minutes before slicing to let the juices redistribute, resulting in juicy and tender meat.
- Slice against the grain: Cutting against the grain shortens muscle fibers, resulting in tender slices of meat.
- Use a stable cutting board: A stable cutting board prevents the meat from moving around while slicing, allowing for even cuts.
In conclusion, to achieve perfectly sliced and tender tri-tip, always cut against the grain. Using a sharp knife and a stable cutting board, identify the grain’s direction, and slice thin and even slices. With practice, anyone can master the art of cutting tri-tip against the grain for a delicious and enjoyable meal.
How To Cut Tri Tip Into Steaks
Determining The Desired Thickness Of The Steak
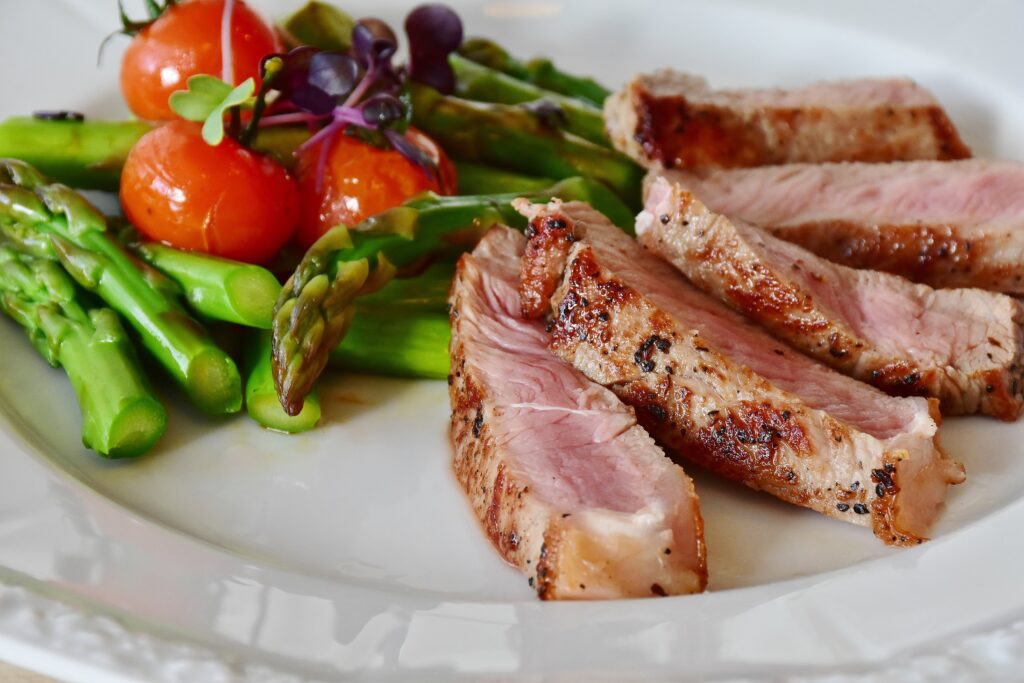
Before starting to cut the tri-tip, it is important to determine the desired thickness of the steak. The thickness of the steak affects the cooking time and the level of tenderness, as thicker steaks require more time to cook and may be less tender than thinner ones. As a rule of thumb, aim for steaks that are around 1 to 1.5 inches in thickness for optimal tenderness and flavor.
Cutting Tri Tip Into Even Steaks
Once the desired thickness is determined, it’s time to start cutting the steak. Follow these step-by-step instructions to cut tri-tip into even steaks:
- Place the tri-tip on a stable cutting board.
- Identify the direction of the grain by examining the meat’s surface. The grain refers to the alignment of muscle fibers, which can be seen as visible lines on the surface of the meat.
- Slice the tri-tip in half lengthwise, perpendicular to the grain. This will make it easier to cut into steaks.
- Starting from the thicker end of the tri-tip, slice the meat against the grain into steaks of the desired thickness. A sharp knife is necessary for this step to ensure clean cuts.
- Continue slicing until you reach the thinner end of the tri-tip. The thinner end may produce smaller steaks that cook faster, so it’s important to keep that in mind.
By following these steps, anyone can easily cut tri-tip into even steaks of their desired thickness. Remember to always cut against the grain for optimal tenderness and flavor. With practice, cutting tri-tip into steaks will become an easy and straightforward process, resulting in delicious and enjoyable meals.
How To Cut Tri Tip For Stew Or Kabobs
Different Methods For Cutting Tri Tip For Different Recipes
Tri tip is a versatile cut of beef that can be used in a variety of recipes, including stews and kabobs. However, cutting tri tip for these dishes requires a different approach than cutting it into steaks. Here are some different methods for cutting tri tip for different recipes:
How To Cut Tri Tip For Perfect Kabobs Or Stew
To cut tri tip for use in kabobs or stews, follow these simple steps:
- Place the tri tip on a stable cutting board.
- Identify the direction of the grain by examining the meat’s surface. The grain refers to the alignment of muscle fibers, which can be seen as visible lines on the surface of the meat.
- Slice the tri tip in half lengthwise, perpendicular to the grain. This will make it easier to cut into smaller pieces.
- Starting from the thicker end of the tri tip, slice the meat against the grain into pieces that are around 1-2 inches in size. A sharp knife is necessary for this step to ensure clean cuts.
- Continue slicing until you reach the thinner end of the tri tip.
By following these steps, you can easily cut tri tip into smaller pieces that are perfect for kabobs or stews. Remember to always cut against the grain for optimal tenderness and flavor. With practice, cutting tri tip for different recipes will become an easy and straightforward process, resulting in delicious and enjoyable meals.
Serving And Storing Cut Tri Tip
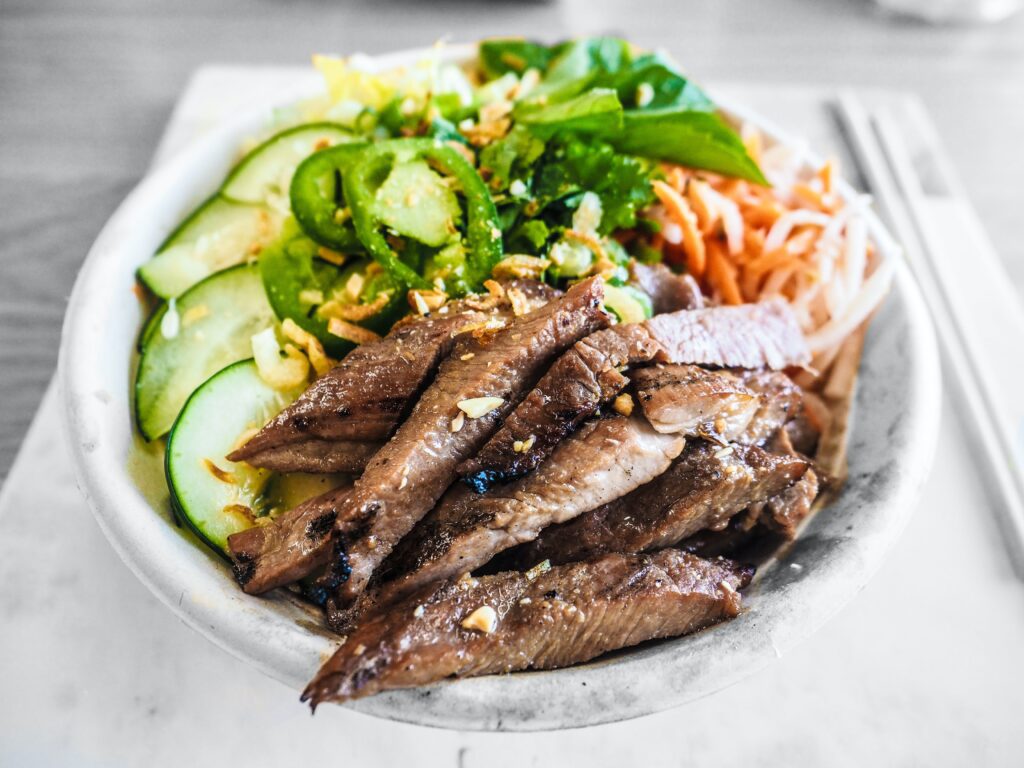
Tri tip is a popular cut of beef that is delicious in many recipes, from stews to kabobs. Once the tri tip has been cut into smaller pieces, it can be served or stored for later use. Here are some tips for presenting the sliced tri tip and storing any unused portions.
How To Present The Tri Tip Slices On A Platter
When serving tri tip, it’s important to arrange the slices on a platter in an appealing way. Here’s how to do it:
- Choose a large platter that will accommodate all of the tri tip slices.
- Start by placing the thicker slices in a circle around the edge of the platter, with the smaller slices in the center.
- Alternate the direction of the slices with each layer to give the platter a decorative, textured look.
- Garnish the platter with fresh herbs, such as rosemary or thyme, and serve.
By taking the time to arrange the tri tip slices carefully, you’ll create a visually appealing platter that’s sure to impress your guests.
The Best Way To Store Unused Tri Tip
If you have leftover tri tip that you want to store for later use, it’s important to handle it properly to ensure its longevity and quality. Here’s how:
- Allow the tri tip to cool to room temperature before storing it.
- Wrap the tri tip tightly in plastic wrap or aluminum foil to prevent it from drying out.
- Place the wrapped tri tip in an airtight container or resealable plastic bag.
- Label the container or bag with the date and contents, and store it in the refrigerator for up to 3 days.
If you need to store the tri tip for longer than 3 days, consider freezing it. To freeze tri tip, wrap it tightly in plastic wrap and then aluminum foil, and place it in a freezer bag. The tri tip will last in the freezer for up to 3 months.

By following these simple steps, you can ensure that your leftover tri tip stays fresh and tasty for future meals.
Conclusion
Tri tip is a versatile cut of beef that can be used in a variety of recipes. Whether grilling, roasting, or smoking, the key to getting the most out of this cut is knowing how to cut it properly. Cutting against the dual-grain nature of the meat is essential to maximize tenderness and flavor. It’s also important to ensure a consistent thickness of the slices for even cooking. Moreover, presenting the tri tip slices on a platter can make them look more appealing, and storing any unused portions properly can help them last longer.
Mastering The Art Of Cutting Tri Tip
Cutting tri tip might seem daunting at first, especially with the dual-grain nature. But with some practice, anyone can master the art of cutting this delicious cut of beef. Follow these simple steps:
- Locate the grain of the tri-tip and slice against it for maximum tenderness and flavor.
- Aim for thin slices with a consistent thickness for even cooking.
- For presentation purposes, arrange the slices on a platter in a decorative way, alternating directions for a textured look.
- For storage, allow the tri tip to cool to room temperature before wrapping it tightly in plastic wrap or aluminum foil, and labeling it with the date and contents.
Tips For Perfect Cuts Every Time
Aside from mastering the cutting technique, here are some additional tips for getting perfect cuts every time:
- Choose a high-quality cut of tri tip from a reputable source.
- Season the meat generously before cooking to enhance its natural flavors.
- Let the tri tip rest for at least 5 minutes before cutting to allow the juices to redistribute evenly throughout the meat.
- Invest in a quality, sharp slicing knife for ease and precision.
By following these tips and techniques, anyone can become a tri tip cutting pro. So, unleash your culinary prowess and enjoy the deliciousness of this tender and flavorful cut of beef!
How to Cut Tri Tip: Mastering the Art of Butchery
Cutting tri tip can be a daunting task for any aspiring home cook or butcher. However, with the right technique and equipment, you can master the art of butchery and make the most out of this flavorful cut of beef. Here are some frequently asked questions that can guide you in cutting tri tip like a pro:
Q: What is tri tip, and how do I choose the right one?
A: Tri tip is a triangular cut of beef that comes from the bottom sirloin of the cow. It is known for its rich flavor, tenderness, and marbling. When choosing a tri tip, look for one that is well-marbled, firm to the touch, and bright red in color.
Q: What tools do I need to cut tri tip?
A: You will need a sharp, non-serrated knife, a cutting board, and a pair of kitchen shears or scissors.
Q: What is the best technique for cutting tri tip?
A: The first step is to remove any excess fat or silver skin from the tri tip. Then, locate the grain of the meat by looking for the lines or striations. It is important to cut against the grain to ensure that the meat is tender and chewable. Start by making a diagonal cut about 1/4 inch deep against the grain on one side of the tri tip. Use this cut as a guide, then continue to make parallel cuts around 1/4 inch apart, keeping the same angle and cutting against the grain. Once you’ve reached the middle of the tri tip, flip it over and repeat the process.
Q: How thick should I cut tri tip?
A: Tri tip should be sliced against the grain into thin, even pieces around 1/4 inch thick. Thicker slices may be chewy and tougher to eat.
Q: Are there any tricks to cooking tri tip after it has been sliced?
A: Yes! To keep the meat tender and moist, try marinating it for a few hours or overnight before cooking. You can also sear the meat on a hot grill or cast-iron skillet, then finish cooking it in the oven or on a lower heat.
In conclusion, learning how to cut tri tip is not as difficult as it may seem. With a little practice and the right tools, you can easily master the art of butchery and impress your family and friends with perfectly sliced and cooked tri tip.

Hey there! If you’re a fan of authentic Mexican cuisine, you’re in for a treat with Humberto Cruz at pointcafeny.com. They take immense pride in serving their customers with home-cooked, genuine Mexican dishes crafted with the finest ingredients. From flavorful salsa to mouthwatering tamales and enchiladas, they offer an experience that brings the taste of family food from back home right to your table. Don’t forget to check out their tempting Daily Specials for a delightful culinary adventure!